
TK20 Faculty Portfolios Support
Preferred Way for Portfolio Documentation Linking
Instead of using pre-defined tables within each section you can use the rich text area (Narrative) section to document evidence for your portfolio.
You can create your own tables and link in a similar method used in the previous system to make it more reviewer friendly.
When creating your own tables it is important that all of your artifacts be saved in the PDF (Portable Document Format) for all documentation otherwise it can break your portfolio. Ignore the Description box; the table function can be used anywhere you see the Narrative or Mini-Narrative sections.

Step 1: Creating Tables
1. Click on the A to open the HTML Editor

Note: The HTML Editor appears with its entire set of tools available to create tables and uploading files.

2. Click on the Table button.
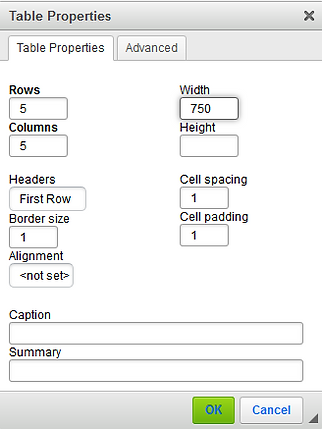
3. Within Table Properties apply these settinsg then press the OK button.
Rows: 5
Columns: 5
Headers: First Row
Border Size: 1
Width: 750
Cell Spacing: 1
Cell Padding: 1
Note: Rows and Columns can be added or deleted by clicking by right clicking on the appropriate area and selecting row or column then the appropriate option.
4. Type the header row for your specific table requirements:
Instructional Activities: Term, Course, Syllabus, Other Instructional Materials, Instructional Technology
Peer and Chair Observations: Term, Course Title, Evaluator, Observation Report
Student Evaluations: Term, Course Title, Evaluation Instrument, Summary & Comments
Course Development: Course, Activity, Documentation
Individualized Instruction: Term, Student Name, Activity, Documentation
Non-Traditional Education and Multi-Disciplinary Programs: Term, Program, Student or Activity, Documentation
Other Student Evaluations: Term, Course Title, Instrument or Activity, Outcome or Report
Departmental Service: Time Period, Activity, Documentation
College Service: Time Period, Activity, Documentation
University Service: Time Period, Activity, Documentation
Note: All other types of documentation are just free form text boxes; however, the ones above require tables.
5. Type the data into rows to document your activity.
Note: Click the maximize button to view the table easier.
Step 2: Uploading Documentation Files
Note: All documentation files must be in PDF format.
-
Highlight the word(s) you want to link your documentation file to in your table of information
-
Click the link button.
-
Click on the Upload tab.
-
Click on the Browse... button to upload the file.
-
Click on the Send it to the server button.
Note: You will receive a confirmation pop-up message, Upload Successful. Press OK to close the pop-up message.
-
Click on the OK button.
-
Repeat for each documenation link.
-
Click on the maximize button again
-
Click on the green Add button.
